New blocked Facebook for 2016 (Update 05/2016)
New blocked Facebook for 2016 100% successful for the network FTP, VNPT, Viettel. Use Facebook to Facebook 8 power.
I've accumulated a lot of experience around the tricks on Facebook is blocked. Please share this experience in this article so people can hand on Facebook without thanks to the help of anyone.
This article will guide you on Facebook is blocked on your computer using the Windows operating system, equipment and other operating systems, click on the corresponding link in the note below.
There are currently quite a lot of ways on Facebook, Genifoti has arranged the following levels from easy to hard (preferred the way of not installing more software support).You can click on the link in the contents section of the content below to move fast to Facebook you want to try.
The new Facebook for 2016
There are many ways on Facebook are shared on the network, but you need to note the following issues:
- The best Facebook is the way does not need to install any extra software support.
- Limit the use of Facebook by IP change, this is the cause for your Facebook account is temporarily locked (automatic).
- Do not use the hosts is provided in places not reputable, this can will make you lose your Facebook account.
- Do not provide your Facebook account password for anyone to support you on Facebook.
3 + Facebook most popular, fastest, most standard, easy to do for
Way 1: DNS Change on Facebook (recommended)
This is the way to Facebook the most simple that I always encourage people to do. Because it's extremely "friendly" with the computer . We will not edit, alter or install any software onto your computer at all. Starting would ...
Step 1: you press the key combination Windows + R on your keyboard.
Step 2: Enter the following command into the Open frame, and then click OK (or Enter key):ncpa.cpl.
Step 3: at this Network Connections window will be open, you right click on the network connections are used (no user will marked with x) select Properties.
Step 4: Select Internet Protocol Version 4 (TCP/IPv4) window in This connection uses the following items , and then click Properties (or double click on Internet Protocol Version 4 (TCP/IPv4)).
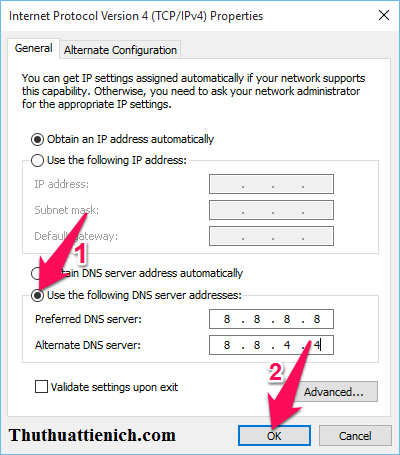
Step 5: click the circle beside the line Use the following DNS server addresses , then try in turn 1 of he 2 DNS :
8.8.8.8
8.8.4.4
or
208 67 222 222
208 67 220 220
Note: entering the following DNS: the DNS entry for example, you enter the number 8 8 8 8 8 + space + 8 + 8 + space + space + number 8.
Typing, you press the button OK to save.
On Facebook is blocked , if still blocked then continue 2.
You can also change the DNS the DNS software uses quick Jumper. See the Guide here.
Method 2: Edit the hosts file to on Facebook
>>> Watch the video guide this page file hosts
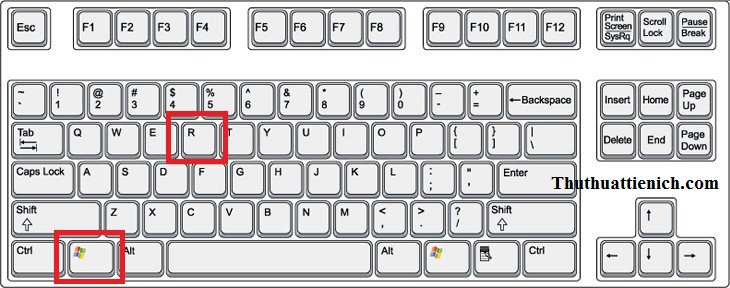
Step 1: you press the key combination Windows + R on your keyboard.
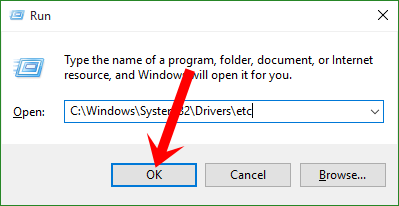
Step 2: Enter the following command into the Open frame and then press the OK button (or the Enter key): C:\Windows\System32\Drivers\etc (or you can also open the folder etc according to the following path: C:\Windows\System32\Drivers\etc).
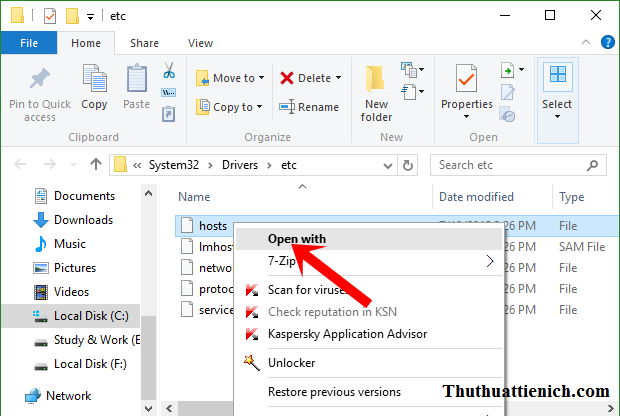
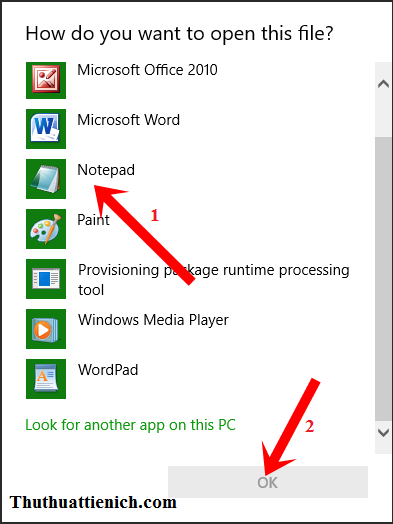
Step 3: at this folder etc will be open, you right-click on the hosts file choose Open with.
Select open with Notepad.
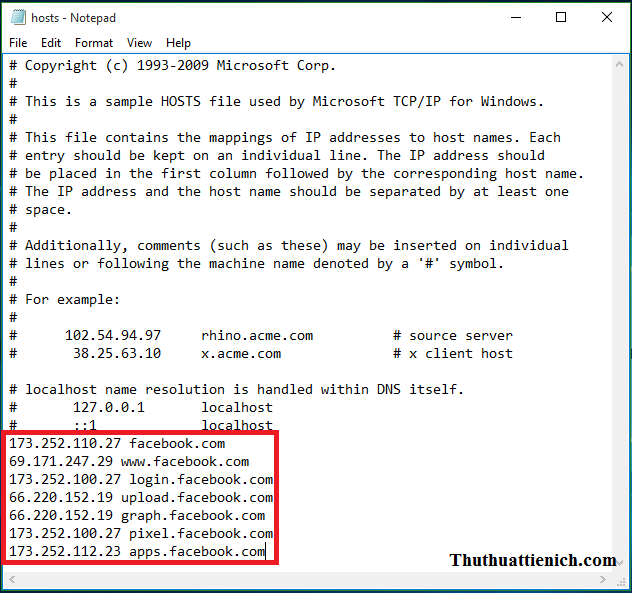
Step 4: Copy the hosts on the latest facebook here glued to the end of the hosts file and then press the key combination Ctrl + S to save. If not saved, then see how the fixes here.
Here there are 2 hosts Facebook still taking good, you try to turn each hosts facebook .
Note: If there are hosts to the old Facebook (format ***. f a c e b o o k. c o m) then you delete them before more hosts to the new Facebook.
www.facebook.com 173.252.100.26
173.252.100.26 www.login.facebook.com
login.facebook.com 173.252.100.26
173.252.100.26 apps.facebook.com
173.252.100.26 graph.facebook.com
register.facebook.com 173.252.100.26
173.252.100.26 vi-vn.connect.facebook.com
173.252.100.26 vi-vn.facebook.com
static.ak.connect.facebook.com 173.252.100.26
173.252.100.26 developers.facebook.com
173.252.100.26 error.facebook.com
173.252.100.26 channel.facebook.com
register.facebook.com 173.252.100.26
173.252.100.26 bigzipfiles.facebook.com
173.252.100.26 pixel.facebook.com
173.252.100.26 upload.facebook.com
register.facebook.com 173.252.100.26
173.252.100.26 bigzipfiles.facebook.com
173.252.100.26 pixel.facebook.com
173.252.100.26 logins.facebook.com
173.252.100.26 graph.facebook.com
173.252.100.26 developers.facebook.com
173.252.100.26 error.facebook.com
register.facebook.com 173.252.100.26
blog.facebook.com 173.252.100.26
173.252.100.26 channel.facebook.com
173.252.100.26 connect.facebook.com
173.252.100.26 bigzipfiles.facebook.com
or
173.252.110.27 facebook.com
www.facebook.com 69.171.247.29
login.facebook.com 173.252.100.27
66.220.152.19 upload.facebook.com
66.220.152.19 graph.facebook.com
173.252.100.27 pixel.facebook.com
173.252.112.23 apps.facebook.com
www.facebook.com 69.171.247.29
login.facebook.com 173.252.100.27
66.220.152.19 upload.facebook.com
66.220.152.19 graph.facebook.com
173.252.100.27 pixel.facebook.com
173.252.112.23 apps.facebook.com
On Facebook have been blocked.
You can use the hosts file to edit, download copy file overrides the old hosts is complete.Details see here.
Method 3: use a web browser & Tor to Cup Cup on Facebook
There are 2 web browser helps you to access Facebook blocked easily which is Important and Tor. Because Bangkok Bangkok is built on a foundation of Chrome and Tor is built on the Firefox platform should make sure the interface will not be so strange to you.
+ Browse Bangkok Bangkok
How to use web browser Facebook Bangkok Bangkok 's extremely simple that anyone can do. You only need to download Important web browser on your computer and then install. Then use the Important browser to access to Facebook is done.
Download Important web browser on your computer
Tips: If using Coke cup that not on Facebook then you open the file hosts as guide in the way 2, delete all the lines of the form * * * f a c e b o. o k. c o m is going to be.
+ Tor browser
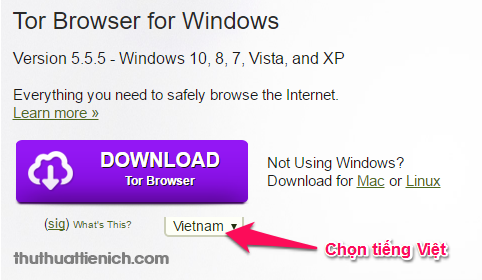
Step 1: download Tor on your computer under this link. Remember to choose Vietnam below the Download button to choose the Vietnamese language for the browser (click to select).
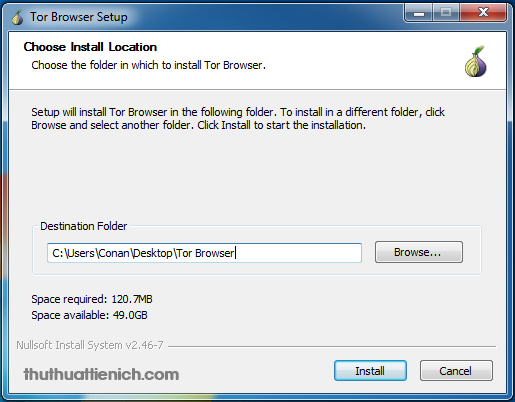
Step 2: next, run the file just downloaded to extract the Tor (Tor does not require installation on your computer that can run consistently).
The process of installing Tor is simple, does not require installation of additional software. You just need to note the section Choose Install Location to select the location of the extract Tor.
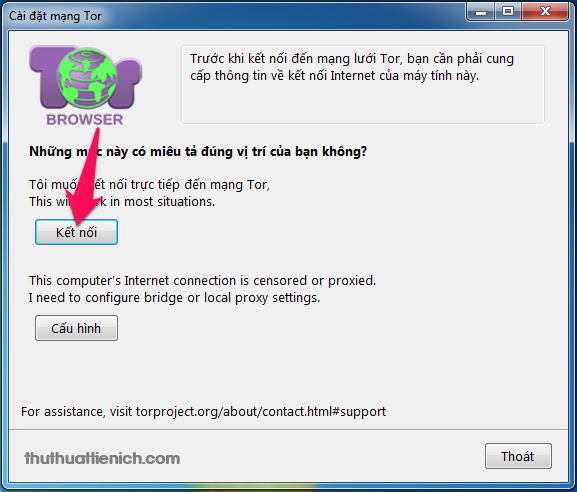
Step 3: after installation is complete, you run the Tor browser. The networking settings window appears, then you press the button the Tor connection.
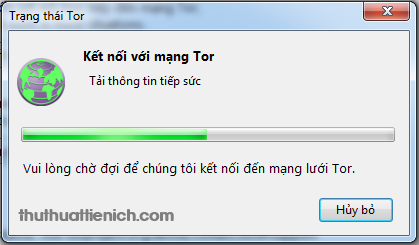
Step 4: wait a minute to connect to the Tor network.
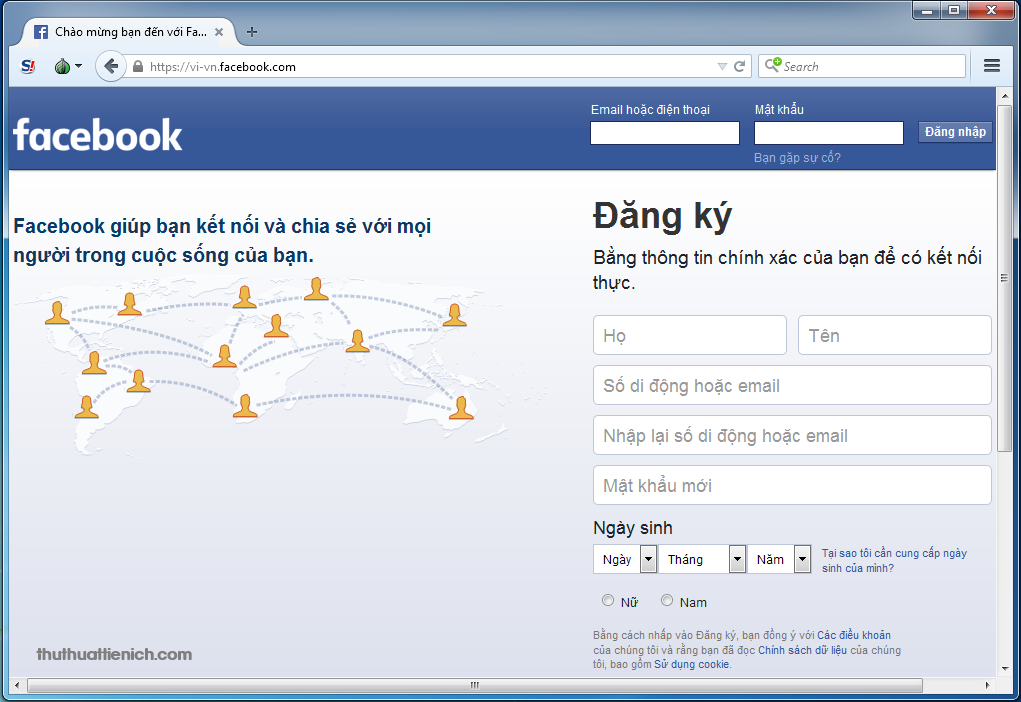
Step 5: use Tor easily access Facebook without being blocked.
Tips: If access to Facebook.com that do not show Vietnamese interface then you visithttps://vi-vn.facebook.com/
The way 4: use Facebook application (only applicable on Windows 8.1 and Windows 7)
5: use Fake IP & VPN sure to be Facebook (but only used when tried on 4 way)
Note: Because sometimes when using VPN or IP change, you are getting Facebook confirm your account (this is Facebook's privacy problems when your account log in a different country – due to the IP change) by viewing the picture to guess the name of your friends. If you have at least your friend could pass easily, however if you have too many friends could not get then you just cancel change IP, Facebook login (using the # Facebook except how IP change) on your computer have previously logged in before it's all right.
And to add one more thing, which is to change the IP of your network speed is slow going.So when does not need to turn off the software, add-on IP change.
5.1. use of VPN & IP change using the add-on for your web browser
+ With Firefox browser
With Firefox: use the Add-on Hoxx VPN Proxy
- Pros: Got server Asian countries such as Japan, South Korea for the network speed faster. At least be asked to confirm your friends over.
- Cons: Must register for an account (very fast).
Begin!
Step 1: From the Firefox browser, you click on this link.
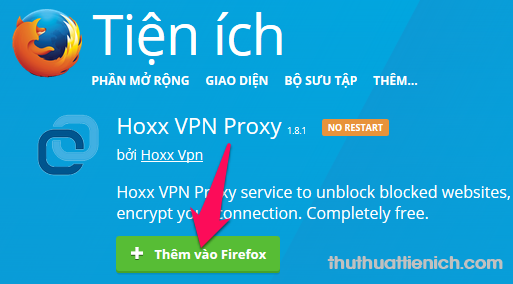
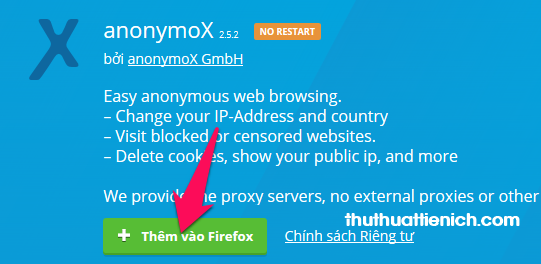
Step 2: press the button Add to Firefox.
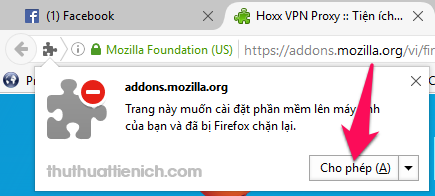
Step 3: press the button allows (if this notice).
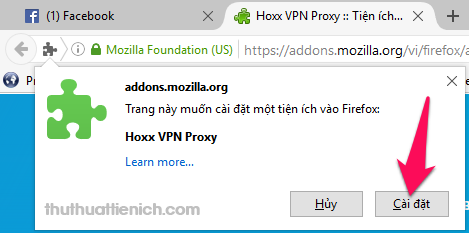
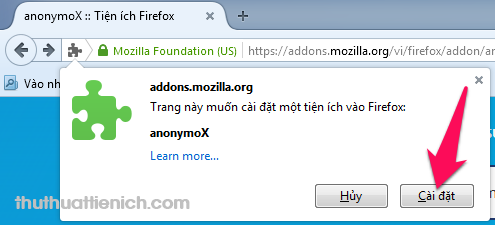
Step 4: press the button install.
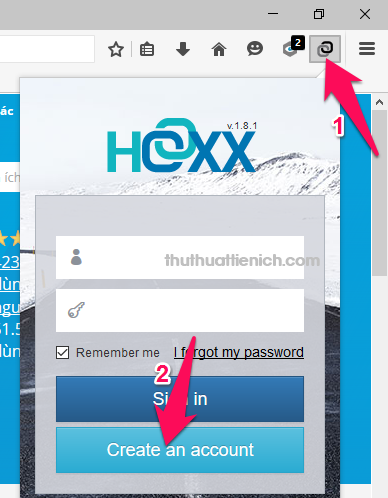
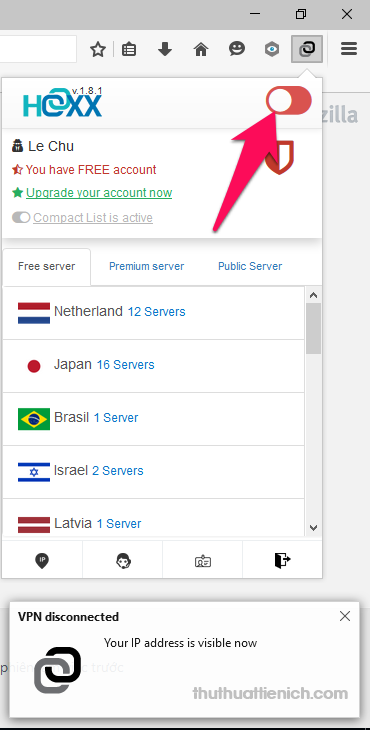
Step 5: at this time there will be a symbol of the add-on Hoxx VPN Proxy (2 circle) was created on the top-right corner of the browser.
You click on this icon, then click the button Creat an account.
Note: has the language anymore, because there is no Vietnamese should you choose English.
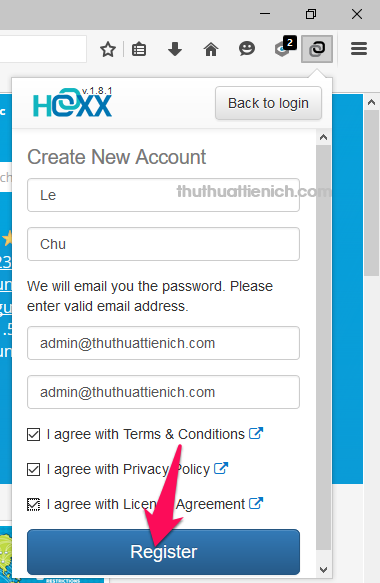
Step 6: Enter information such as name, surname, email address, then click the part I agree, and then click the button Register.
Note: Email is email really are taking to get the password. If not have email, pleaseregister an account as instructed here. Encouraged to use Gmail.
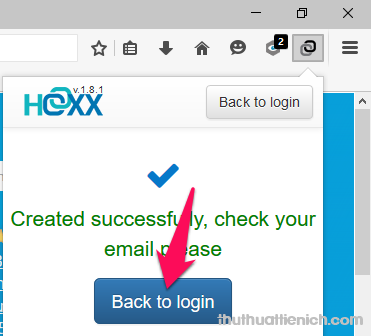
Step 7: registration successful message, you click the button Back to login to the login window.
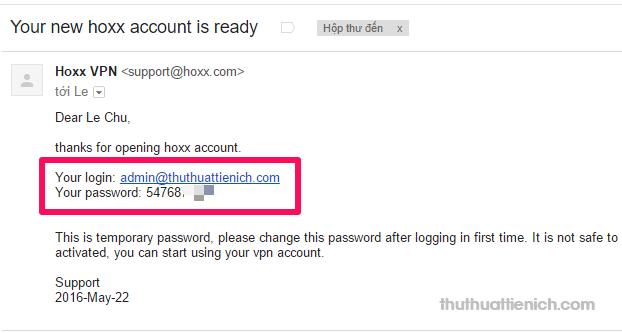
Step 8: open the email just enter when signing up, you will see a new message from Hoxx VPN contains the password for your account.
Note: If in your Inbox, check your Spam mailbox in view.
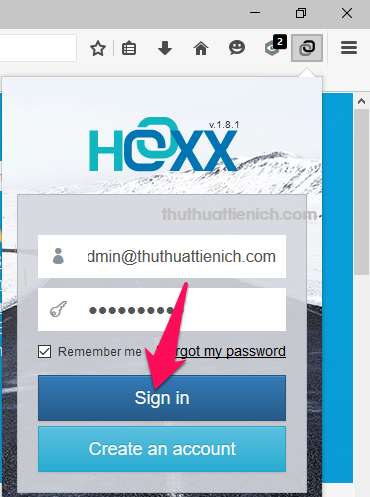
Step 2: login with the email and password received.
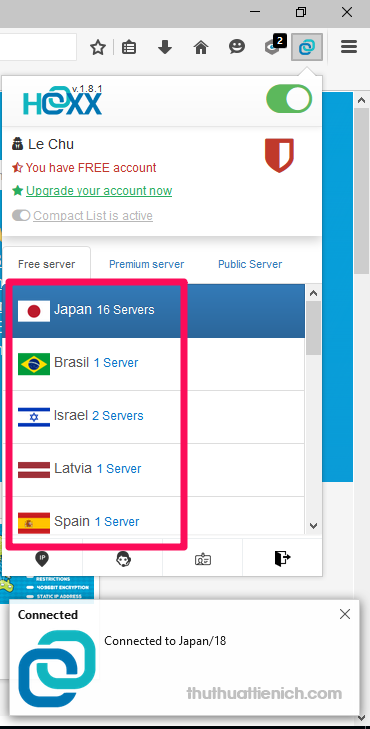
Step 10: there are 3 types of server: Free, Premium and the Public. We just use the free version (Free) is enough. You would have the condition can upgrade to the Premium version with many more, more more national servers and better speed.
To connect, simply click on the name of the Sever, recommended server in Asian countries such as Japan (Japna) or South Korea (South Korea) or Singapore will give the best speed.
The popup appears at the bottom of the screen with the message Connected to ... have successfully connected.
At this time be sure to be Facebook.
To turn off the Hoxx VPN, you just need to press on the button switches (left brick color-Ricochet) top right corner of the window Hoxx VPN.
+ With the Google Chrome browser and Bangkok Bangkok
With the Google Chrome web browser & Cup of Cups: use the Add-on Hoxx VPN Proxy
- Pros: Got server Asian countries such as Japan, South Korea for the network speed faster. At least be asked to confirm your friends over.
- Cons: Must register for an account (very fast).
Begin!
Step 1: From the browser Chrome/glass of Coke, you click on this link.
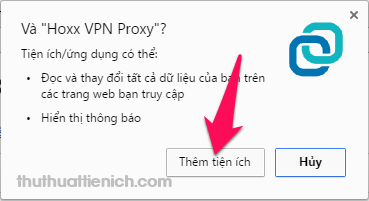
Step 2: Click the Add button to Chrome.
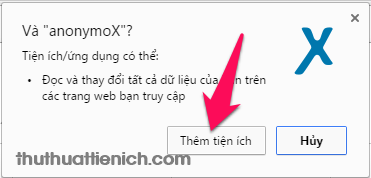
Step 3: press the button Add.
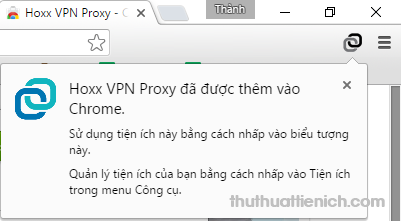
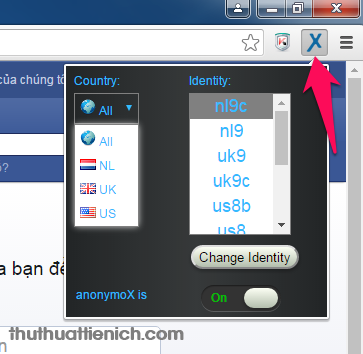
Step 4: Hoxx VPN Proxy is successfully installed, there will be logo (2 circle) was created on the top-right corner.
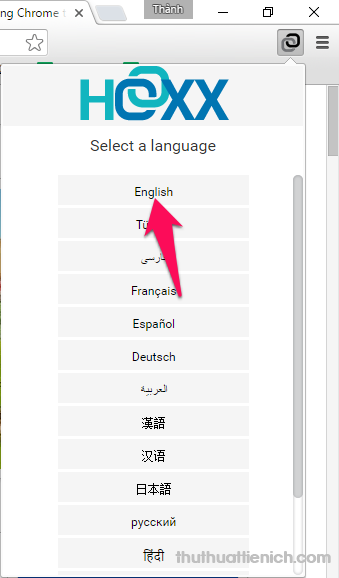
Step 5: click on this icon, Hoxx Proxy VPN will ask the language you want to use, no Vietnamese should you choose English (English).
Step 6: To use Hoxx VPN, you need to create an account. How to create similar on Firefox browser, you review here. After you have an account, you login VPN Hoxx with that account.
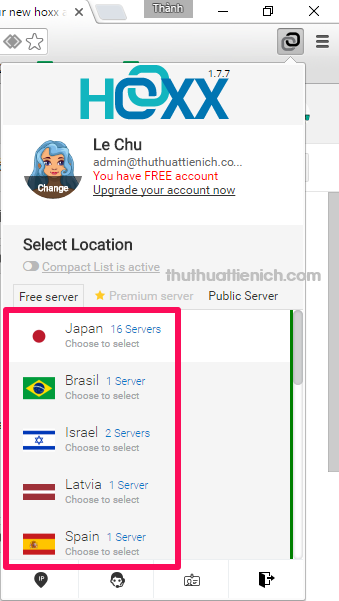
Step 7: to connect the VPN server n Ridin, you only need to click on the name of the server (also the name of the country).
Recommended server in Asian countries such as Japan (Japna) or South Korea (South Korea) or Singapore will give the best speed.
To disable the VPN, you need only press the button Turn off VPN Hoxx VPN window on the top.
5.2. Using VPN & IP was changed by the software
+ Use UltraSurf software
In this article I will introduce a modified change IP by using UltraSurf software. You download the software to your computer here.
After downloading, extract with decompression software on your computer: Winrar or 7-zip (See how to extract with Winrar and 7-zip).
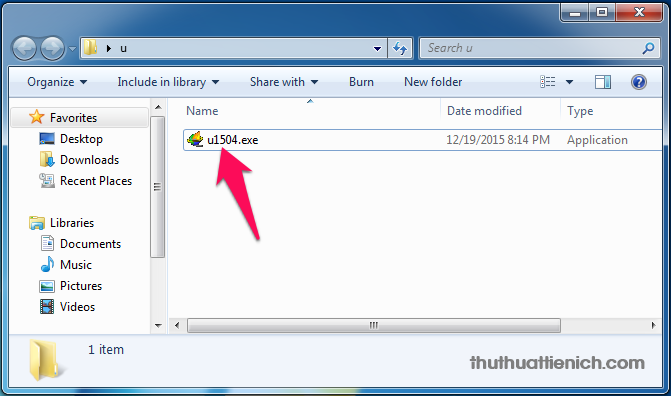
Open the folder just unzip, you will see a file uxxx.exe (where xxx is the version of the software – like the image below is 1504). Run this file to use the UltraSurf software immediately without installation.
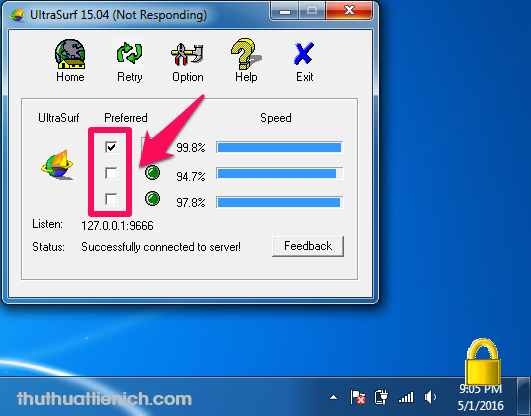
After running the UltraSurf, your IP will be changed soon, defaults for your server will have the UltraSurf best speed (see translation Speed ). You can change to another Server if after running the UltraSurf is still not on Facebook by way of integration into the corresponding squares in thePreferred.
To exit the UltraSurf software and change the IP you just press the button Exit on Windows software.
+ Use the Hotspot Shield software
The majority of the VPN software are free, you can use the Hotspot Shield software: 7 day trial.
Download Hotspot Shield software here
Because the article was too long and so I will use Hotspot Shield software in a different article.
Learn more about how thoroughly Fake IP
5 on the way to you on Facebook is blocked successfully. Make sure that you have done as the instructions above before seeking help.
Wish you success!!!
New blocked Facebook for 2016 (Update 05/2016)
 Reviewed by Unknown
on
9:31:00 AM
Rating:
 Reviewed by Unknown
on
9:31:00 AM
Rating:







No comments: